Changing the plug on an electrical appliance is a simple task for many UK households, but it’s also something that should be approached with care.
A plug is a crucial link between your appliance and the mains supply, so making sure it’s fitted correctly is essential for both the safety of the user and the proper functioning of the device.
Whether you’re replacing a damaged plug or fitting a new one to match UK standards, the process involves wiring a new plug onto the end of an electrical cord.
Before getting started, it’s important to understand that electrical work, however minor it may seem, can be dangerous if carried out incorrectly.
Faulty wiring can lead to short circuits, tripped fuses, or even fire hazards. For this reason, if you’re at all unsure about handling electrical wiring, the safest option is to consult a qualified electrician. Professional support may save you time, worry, and ensure peace of mind.
That said, changing a plug is a straightforward job for anyone confident with basic DIY and able to follow instructions carefully.
By taking the right precautions and using the correct tools, you can safely replace a plug yourself. Below, you’ll find a step-by-step guide to help you through the process.
Materials You’ll Need:
- New UK plug
- Wire cutters/strippers
- Screwdriver
- Electrical tape
- Wire connectors
Gathering the right materials in advance will save you time and help the job go smoothly. A good quality UK plug is important to ensure durability, and proper tools like wire strippers and screwdrivers make the process much easier and safer.
Safety Precautions:
- Ensure the appliance is completely unplugged from any power source.
- Work in a well-lit, dry area to avoid unnecessary risks.
- Double-check that the plug you’re fitting matches the voltage and current rating of your appliance.
Taking these safety measures seriously is absolutely vital. Even though this is a relatively small electrical task, rushing or skipping precautions can lead to costly mistakes or accidents. Always double-check your setup before moving on to the wiring stage.
Step-by-Step Guide to Changing a UK Plug
1. Prepare the Plug
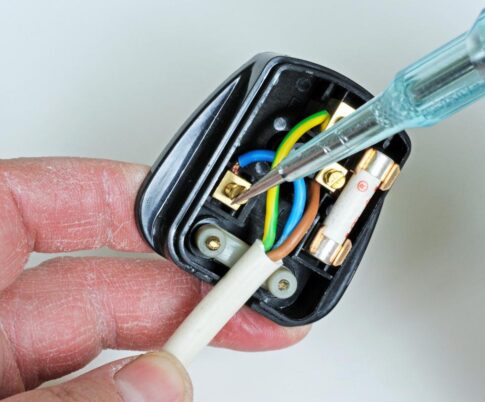
Start by opening up your new plug. Most plugs are held together by a single screw in the centre; simply undo this with a screwdriver and separate the casing. Inside, you’ll see the three connection terminals marked with letters: ‘L’ for live, ‘N’ for neutral, and ‘E’ for earth (sometimes shown with the earth symbol).
2. Remove the Old Plug and Strip the Cable
Use wire cutters to remove the old plug by snipping the cable a short distance above where it enters the casing. Then, carefully strip back the outer layer of insulation by about three to four centimetres. This will expose the individual wires inside — typically three in total. In modern UK wiring, the live wire is brown, the neutral is blue, and the earth is green and yellow.
3. Prepare the Wires
Each of the inner wires is insulated too, so you’ll need to strip about one centimetre from the end of each one. Be gentle here; you only want to expose the copper strands inside, not damage or cut them away. If the strands look messy or frayed, twist them together lightly with your fingers so they form a neat end that will sit securely in the terminals.
4. Connect the Wires
Now it’s time to attach each wire to the correct terminal inside the plug:
- The live (brown) wire goes to the terminal marked ‘L’.
- The neutral (blue) wire goes to the terminal marked ‘N’.
- The earth (green and yellow) wire goes to the terminal marked ‘E’ or the earth symbol.
Loosen each screw slightly, insert the wire, and then tighten the screw until the wire is firmly clamped in place. Give each one a gentle tug to check it’s secure — none of the copper should be exposed outside the terminal.
5. Secure the Cable Grip
Most UK plugs include a small plastic or metal clamp known as a cord grip. This holds the outer insulation of the cable in place so that any tugging on the cord doesn’t pull directly on the wire connections. Position the cable neatly in the grip and tighten it until it feels secure.
6. Close the Plug
Once everything is in place, carefully reassemble the plug casing. Make sure the wires are tucked inside properly and not being pinched by the cover. Tighten the central screw so the plug feels solid and secure.
7. Add Insulation if Needed
If there are any small exposed sections of wire, wrap them with a little electrical tape to prevent accidental contact. This isn’t always necessary if your connections are neat, but it’s a good extra precaution.
8. Final Check
Before using the appliance, double-check your work. Each wire should be in the correct terminal, the screws should be tight, and the cable grip should hold the cord firmly. Nothing inside the plug should be loose or rattling.
9. Test the Plug
For extra safety, you can use a socket tester or multimeter to confirm that the wiring is correct. If everything checks out, plug the appliance in and test it.
Final Thoughts
Changing a plug is one of those small but essential skills that can save you both time and money. Done properly, it’s safe and straightforward, giving your appliance a new lease of life. But remember: if you’re ever in doubt, it’s always better to call on the expertise of a professional electrician. Safety should always come first when working with electricity.

